Menu
The devices were roughly preset. Please check the needle position (which may have variations in curvature and composition) Check all settings and set the needle to your individual needs before you start the vaccination.
Remember: It is very important that the Plunger (the blue O-Ring) is sprinkled with oil before each use (after each cleaning and disinfecting). Without oil, significant problems can arise!

Mit dem Laden des Videos akzeptieren Sie die Datenschutzerklärung von YouTube.
Mehr erfahren
The Filter/Regulator is preset at 3 – 3 1⁄2 bar (BioJector with one syringe) or 3 1⁄2 – 4 bar (BioJector with two syringes) with the on/off switch in the “on” position. Pressure is adjusted by loosening the locking screw on top of the adjusting knob and turning the knob until the desired pressure is indicated on the gauge.
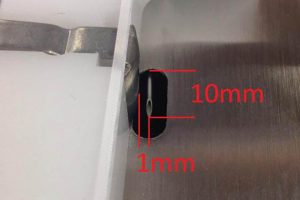
There are three means of adjustment relating to needle position. The first set of adjustments consists of four Allen screws which, when backed off, allow the main base plate to be moved side to side to center the needle in the hole on the front cover. The second set of adjustments also consists of four Allen screws, which, when backed off, allow the sliding base plate to be moved forward or backward on the main base plate to adjust the depth of needle penetration. The third set of adjustments consists of the spacers beneath the main base plate at each Allen screw. These spacers may be added or taken out to raise or lower the main base plate and adjust the height of needle penetration. These adjustments are preset at the factory and little adjustment, if any, should be necessary unless the machine has been severely mishandled in transit or is being disassembled for major cleaning. To check needle adjustment place on/off switch in manual and adjust the needle to the dimensions shown in the photograph on the left. We recommend exchanging the needle after each 1.000th-1.500th injection.

All prices incl. VAT.
All striked out prices refer to prices used to be charged at this shop.